Friday, November 29, 2013

Our Handmade Copper Tree

The final product, in all its gleaming upcycled glory:

copper christmas tree

There were a couple of years that we went completely treeless at Christmas, when my kids were quite young and wouldn't miss it. But I do like having a big tree to decorate, with beautiful presents piled underneath.


fabric wrapped christmas presents

For a few years we would go out of town in early December and cut a tree from a little tree farm, and then one year we discovered buying the ones already trucked into town and sold in lots was way cheaper. Still, cutting or buying a new tree each year never sat well with me. It just seems like such a waste, in more ways than one. It's part of the uber-consumption of the holiday season that we generally do well to avoid.


We considered buying a fake tree, and talked to a lot of friends who are very happy with theirs. I liked the idea of having one tree to use every December forever, without creating more waste each year. I was not happy with the off-gassing factor of artificial trees though. Also, many fake trees are pre-lit, and the biggest problem with that appears to be that the light strands will die in big sections, as light strands do, and then you end up with a half-lit tree, and ultimately a bunch more trash in the landfill.


metal christmas tree

We borrowed a white metal yard tree from a friend one year, and used that in our living room. I kind of liked the stark simplicity of the metal, but with half the lights out it was rather haphazard looking. One day, after gazing for a moment at our semi-ugly borrowed metal tree, Nik declared that he could make a better one.


copper christmas tree
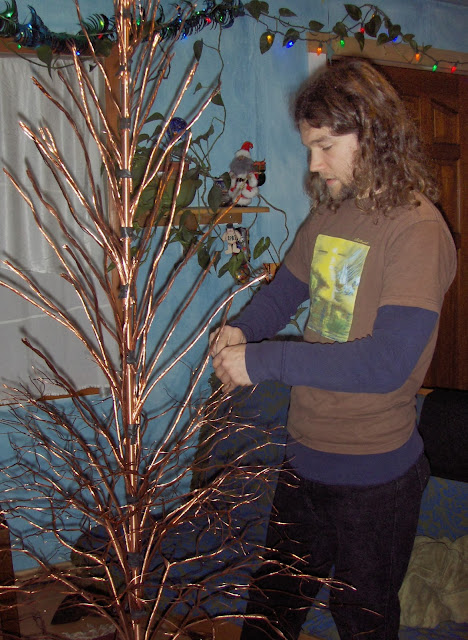
Creating the branching effect
He got to work right away. The only thing he needed to buy for it was a copper lightning rod, to use as the tree trunk. The rest of the copper came from stripped electrical wires, leftover from the rolls of wiring he had for a house project. 

copper christmas tree
You can see in the picture how he wound a thick layer of extra rubber tubing around the base of the tree so it would work in a conventional tree stand.
Stripping the wiring of its protective coating was not an easy task, but once he had that done, building the tree was fun and easy. To continue with the upcycling trend, he used strips of old bicycle tubing to lash the branches to the trunk. Then he unwound the wires to make them branch in natural patterns... And then we had our tree! Simple, mostly free materials, and what's more beautiful than gleaming copper?

copper christmas tree
The wire is plenty strong for all our ornaments. You can see in this photo how we simply wind the light strand around the trunk of the tree rather than around the perimeter as you might for a pine tree.

copper christmas tree
I think the gold tree star topper looks fabulous on the copper tree.
This will be our third year using it, and it's still as beautiful as ever!

Below are Amazon Affiliate Ads. Any purchase made through them helps support our family. Thanks in advance!
Read More

How To Make Your Own Cacao Powder

We grind our own fresh cacao powder, as we need it, from whole raw cacao beans. Much like coffee beans, cacao will be at peak flavor right after grinding. And like grains and other seeds, nutrition deterioration begins as soon as they are ground. 


whole cacao

The whole raw cacao beans keep much better than pre-ground powder, and store for a long time in a cool, dark place. When I want cacao for a recipe, I simply use my coffee grinder to blend up the amount I need.  


fresh cacao powder
The grind I make may not be as fine as storebought, but I would say the quality, nutrition, and freshness make up for it!
I do grind coffee in the same mill, and am never bothered by any coffee flavor in my chocolate or chocolate flavor in my coffee. They go pretty well together, and any small residue from sharing the equipment hardly matters. 

Whole raw cacao beans can be purchased in bulk from Azure Standard, a natural foods distributor. Below are Amazon Affiliate Ads. Any purchase made through them helps support our family. Thanks in advance! 

Read More

Sunday, October 20, 2013

Garlic Honey, An Effective Cold Remedy

garlic cloves

An excellent remedy for the cold season, this simple blend of raw garlic and raw honey is quick to make and surprisingly tasty. While I love garlic, the idea of eating even one clove of raw garlic straight does not appeal to me, no matter how good for you it is. However, this simple combination makes huge amounts of raw garlic very palatable.

I first made this when I had been sick for a few days and none of my normal remedies (nettle tea, rest, neti pot, gargling with salt water, avoiding sugar) were doing the trick. I was just not getting better, until the morning I made this. I ended up eating an entire head of raw garlic that morning, and immediately felt so much better that I made and ate a second head of garlic honey that afternoon. 

make garlic honey

My illness was gone, and I just felt good. I continue making garlic honey regularly now, even when healthy, just because I like it! Here is the recipe:

make garlic honey

Peel and mash one head of garlic. You can mince it finely if you don't have a garlic press. Stir together with about half the volume of raw honey, until it forms a thick paste. I use about one teaspoon of honey for maybe 7 cloves of garlic, but you can use as much as equal parts garlic and honey if you are worried about the taste. Let this mixture sit for several minutes, give another quick stir, and then eat in tiny spoonfuls whenever you want, as often as you like.

make garlic honey

This will keep safely on the counter for a couple of days, or in the fridge for longer. 

garlic honey

Below are Amazon Affiliate Ads. Any purchase made through them helps support our family. Thanks in advance!
Read More

Friday, October 11, 2013

Start Or Join A Buy Nothing Facebook Group


crowd at the beach

This was exactly what I'd been looking for. The Buy Nothing Project (BNP) was created not only to reduce overall waste and consumption by redistributing goods that people are done with, but also- and perhaps more importantly- to help build community through sharing abundance within local groups.

About a year ago a group of us from Sustainable Burien formed a temporary book club to read and discuss Charles Eisenstein's book, Sacred Economics. We all came to the same conclusion: We wanted a more thriving community, a culture centered around sharing and mutual happiness and support, and an alternative economy based on gifting, rather than the scarcity model that encourages hoarding and isolation.

snowy street

So, when we heard about the Buy Nothing Project, my friend Rebecca and I knew it would be a wonderful move in the right direction for our community. We contacted Liesl Clark, one of the creators of Buy Nothing, and she set up our facebook group the next day. Rebecca and I are now the administrators of our local group, but the outlines and rules for the group were formed by the BNP. Our group is part of a quickly growing network of regional facebook groups, all based on gifting and building community.

For years I've been a member of a freecycle group, which has been great in terms of reducing waste, since we can easily rehome anything we're ready to get rid of. It's also a useful forum for requesting things before we buy them new. But I would not say it is much of a medium for building real community. The email addresses the group is based around are too anonymous, and the area each group covers is too large to enable a personal connection between other members.

fresh rhubarb
Perhaps you'll have some garden bounty to share!

The way Buy Nothing differs is that each post is linked with a facebook user profile, and each group is limited to smaller geographic areas. The limited area helps reduce driving time and gas usage when making physical connections to pick things up. The fact that we use our actual facebook profiles encourages real connections to be made, since it's easier to recognize who you are messaging when there is a picture profile attached. It also discourages people like professional refuse seekers, who score freebies only to sell them, from taking advantage of the generosity of others. Anyone who breaks rules or is creepy can easily be blocked from the group.

We are thrilled to bring this project to Burien. If you are interested in starting a group of your own in an area not already covered by a Buy Nothing group, here is the info page on how to set up a Buy Nothing group. First, you might want to check here to see if there is already a group that serves your area: buynothingproject.org.

Below are Amazon Affiliate Ads. Any purchase made through them helps support our family. Thanks in advance!
Read More

Monday, September 16, 2013

Dehydrated Flax Seed Crackers


raw flax crackers

At their most basic, these economical, gluten-free crackers are simply flax seeds soaked in an equal volume of liquid, and then dehydrated until crisp. They can be sweet or savory, spicy, salted, or (my favorite) soaked in raw sauerkraut brine.

flax seeds

For sweet crackers, try using fruit juice as the soaking liquid. Add some cinnamon if you want. For savory crackers, try your favorite herb combination, plus a generous pinch of sea salt. If you happen to have some sauerkraut brine, throw it in!

make flax seed crackers

Soaking only takes about an hour, but longer is OK, up to about 4 hours. Stir the flax seeds into the liquid and they quickly start to gel. Let it soak until the mixture turns into a thick dough.

dehydrate flax crackers

Spoon the dough onto parchment paper or dehydrator sheets, and spread each cracker with the back of the spoon until they reach a uniform thickness. Dehydrate at 110 degrees for four to six hours, then flip and dehydrate another two hours or so, until both sides are bone dry. Actual dehydration time varies based on temperature, humidity, and the thickness of your crackers, but overdrying won't hurt. 

dehydrate flax crackers
Made during a dry summer, this batch dehydrated all the way through after just 6 hours, without needing to be flipped.
You want them nice and crisp- moisture left in the crackers will cause them to store poorly. Kept in a sealed container in the fridge, they can last for a month or more.

Savory flax crackers are great with hummus or guacamole. Sweet flax crackers go well with peanut butter or cream cheese.

raw flax crackers

Flax seeds can be purchased in bulk from Azure Standard, a natural foods distributor that we love. I'm adding an ad link below to the absolute best dehydrator that I know of. I've used mine for years and love it, and the price has even gone down from when I bought it. If you use my link to make a purchase, Amazon kicks us back a little bit, which is helps to support our family. Thanks in advance!

Read More

Dehydrated Flax Seed Crackers


raw flax crackers

At their most basic, these economical, gluten-free crackers are simply flax seeds soaked in an equal volume of liquid, and then dehydrated until crisp. They can be sweet or savory, spicy, salted, or (my favorite) soaked in raw sauerkraut brine.


flax seeds

For sweet crackers, try using fruit juice as the soaking liquid. Add some cinnamon if you want. For savory crackers, try your favorite herb combination, plus a generous pinch of sea salt. If you happen to have some sauerkraut brine, throw it in!


make flax seed crackers

Soaking only takes about an hour, but longer is OK, up to about 4 hours. Stir the flax seeds into the liquid and they quickly start to gel. Let it soak until the mixture turns into a thick dough.


dehydrate flax crackers

Spoon the dough onto parchment paper or dehydrator sheets, and spread each cracker with the back of the spoon until they reach a uniform thickness. Dehydrate at 110 degrees for four to six hours, then flip and dehydrate another two hours or so, until both sides are bone dry. Actual dehydration time varies based on temperature, humidity, and the thickness of your crackers, but overdrying won't hurt. 


dehydrate flax crackers
Made during a dry summer, this batch dehydrated all the way through after just 6 hours, without needing to be flipped.
You want them nice and crisp- moisture left in the crackers will cause them to store poorly. Kept in a sealed container in the fridge, they can last for a month or more.

Savory flax crackers are great with hummus or guacamole. Sweet flax crackers go well with peanut butter or cream cheese.


raw flax crackers

Organic flax seeds can be purchased in bulk from Azure Standard, a natural foods distributor that we love. I'm adding an ad link below to the absolute best dehydrator that I know of. I've used mine for years and love it, and the price has even gone down from when I bought it. If you use my link to make a purchase, Amazon kicks us back a little bit, which is helps to support our family. Thanks in advance!

Read More

Monday, September 9, 2013

How To Save An Unripe Avocado That's Been Cut

ripening avocados

Despite the best of intentions, there have been several times when I've unintentionally sliced into an avocado before it was really soft enough to eat. You want to get it before it's mushy and brown inside, but if you miscalculate, and don't give it enough time to ripen, I have good news.

Unripe avocado is starchy, flavorless, disappointing, and downright unpleasant to eat, and it used to be that I would throw them into the compost, feeling like a fool for not giving them more time to mature. Fortunately, a few years ago I came across this information: Avocados will still ripen once they've been cut into!

cut avocado

Simply put the halves back together as neatly as you can, and walk away like nothing happened. It's essential to leave the pit in place. In a couple of days, the avocado will have transformed into the rich deliciousness that you wanted all along.

I'd like to say that I'm careful enough to no longer unwittingly slice into an unripe avocado- but it happens. It's heartening to know that it no longer means the avocado is a complete waste.

half avocado
Below are Amazon Affiliate Ads. Any purchase made through them helps support our family. Thanks in advance!
Read More

Thursday, July 18, 2013

For The Ladies: How To Never Buy Another Menstrual Product

Reusable menstrual product?? Do tell!

 
I bought this Keeper 13 years ago, and have been using it happily ever since.

Before discovering that these existed, I had tried all manner of other menstrual products. I hated the disposable-diaper feeling of typical maxi-pads. Cloth pads were a pain to wash and deal with when I was out of the house, plus they felt bulky. Most tampons created so much garbage with their box, wrappers, and disposable applicators. For years, I used applicator-free tampons, but even these created some garbage, and required buying a new box each month. I've always hated anything disposable, really.

On the beach in Yucatan, a fellow traveler gave me a sea sponge, which was inserted like a tampon (after being disinfected with boiling water). I loved the idea of a natural sea sponge tampon, but unfortunately, I always knew when it was saturated because blood would leak out when I laughed or sneezed. It didn't exactly meet my needs, and it didn't last forever. When it started to wear out, I went back to disposable tampons.

When I got fitted with a diaphragm, the nurse informed me that the diaphragm could also be used as a menstrual product! This worked for me to some degree. I loved that you just had to rinse and reinsert it, and there was nothing to throw away, but emptying it was kind of a mess. I had trouble getting it out and to the sink without drips dropping where I didn't want them. Tampons were mess free, so I went back, but I was dissatisfied.


Finally, when I was in college I discovered The Keeper at my local health food co-op. It seemed a bit expensive, but I quickly calculated that it would be paid off after just a few months of not having to buy tampons, plus I got a volunteer discount at the co-op. I've saved an absolute fortune in the decade-plus that I've had The Keeper in use.  It works every bit as well as the day I bought it. (See the end of the article for a much less expensive version.)


menstrual cup keeper

There are other brands, by the way, of very similar products, and I don't necessarily think this is better than any of the others. It's just the one I've had experience with. Mine is rubber; there are silicone models for people with latex issues.

Directions come in the package, and are on the product website as well, but basically you simply fold the cup up and insert it into the vaginal canal. This can be easier if you wet it first. Every 3 to 8 hours, depending on how heavy your period is, simply grasp it by the handy tail while pushing in on one side of the cup to release the air seal, and pull it out. Dump the contents down the drain, wash in hot water, and it's ready to insert again.

menstrual cup keeper diva cup

I've used the Keeper during all kinds of exercise and activities, without incident. I regularly do Bikram yoga, and never miss a class because of my period. I go dancing, ride a bicycle, go swimming, and have literally never had the Keeper leak on me.

I find it very liberating to be independent this way, to be able to take care of my periods without having to rely on tampon manufacturers every month.


Update: My original Keeper is still going strong, but if I ever have to replace it, it's heartening to know that there are now much less expensive, silicone models available. The ad link below is the one I would buy if I ever need a replacement. Click on the link to check it out. Every purchase through this affiliate link provides a little income for our family. Thank you in advance!


Read More